Been reading the Stobist material, and it has me thinking more about using different light sources as variables - including ambient.
Cap is our 15 year old Coon cat, seen here in a regal pose at f2 on a 50mm. I squared, selectively sharpened, and vignetted it in LightRoom. He's a study in energy conservation, including his hooded eyes. Not a bad available light portrait.
Now let's look at him using light as a controllable variable. The background is pleasing, but I think a splash of light lower left would brighten him up a bit and reveal the character of his eyes.

There's a few ways to accomplish this without ruining the atmosphere. One way might be to bounce a flash backwards off the back wall. Problem is, that wall is brown, and the vertical angle is not right. The ceiling is white, but the angle from above will shade his eyes even more.
Another way would be to place a white reflector lower left and bounce a dialed-down flash off it. Of course an umbrella reflector would accomplish the same thing.
What about the distance of the reflector from Cap? Close up or far away? Here I believe being farther away will allow the background to be lit also. That means, therefore, that the opposite would be true - a reflector placed close by would tend to isolate him from the then-more darkened background.
The easiest and more cat-friendly method, however, would be to simply place a flat white reflector - a piece of mat board for example, on the floor in front of him. Plus the angle would be just right to see into the eye shadows a bit more. So here's the point: while there are different ways to skin the cat (sorry Cap), they don't have to include lots of equipment. Lots can be done by first seeing the light and using ambient sources as one of the variables with which to work.
Here's another, this time of the guy who feeds Cap. How was it lit? A hint is that I used a reflective umbrella, but where and from which angle? To confuse things, the natural light actually bounces around the room due to windows and a mirror behind the camera. The shadows give it away.
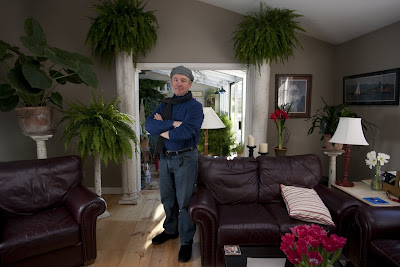
If I were to do this one again, I'd want to move the reflector to upper right to boost the existing natural light, add to the shadow on the face (it's washed out due to being lit evenly from both sides), and preserve the natural look.
So here were a few thoughts on seeing and using light. Lots to learn and fun doing it.
Suggestion - read the Stobist if for no other reason than to be more aware. It's all about seeing the light.
 Hey, I think I've got this figured out. Been trying to post since Mel set up the blog. Very frustrating to be less that clever. Did a couple of shots as tests for Garnet Hill this past week with only two lights and a huge reflector (actually two pretty big ones attached to one and other) Thought you might find them interesting. Spotlight at very high power for a main about 12 feet away and the second head on a leaf image background. Big fill straddleing the fence in the hat shot and to the left in the shoe shot.


